🗞️ What's new
  • 🔖 It looks like you are browsing the site as a guest. By registering on the site you can participate on the Internet's largest Polaris Ranger XD 1500 forum. To register, simply Click Here!

Back seat removal

claydoc

New member
Joined
Apr 11, 2025
Messages
17
Media
7
Reaction score
6
In my attempt to soundproof and insulate every inch of my crew cab, I have gotten to the back seats. Has anyone removed the upper back seats, and if so, how in the world did you do it?
 
I haven’t attempted it yet; but do a search, it’s been done. The whole back seat is one big frame I believe, and you have to remove 4 bolts from engine side of wall. I recently got a service manual too, so I’ll check it.
Any pics of what you did to seal dash?
 
The drivers side rear. Pop lower cushion off, then remove 4 nuts holding lower seat frame to body. Then whole seat frame will remove.
 
The service manual says to push on rear cushion with screwdriver through a hole while pulling down and out from inside.
Yeah, what hole…Ha!
It’s still a mystery!
 
I’ll gather my pictures, but I’m currently enjoying dirt road therapy. After researching here and experimenting, I hope I’ve identified most of the areas that require sealing.
 
I recently purchased the XD 1500. So far, my young son and I have insulated the front fender sidewalls, the roof, both tunnels, and all four doors. We attempt to add one to two layers of sound-deadening mat, followed by a layer of insulating foam where space permits.

The next project will be to insulate the back wall, which is a significant source of noise and heat. Although I haven’t examined the dash extensively yet, I intend to remove it to insulate the front wall.

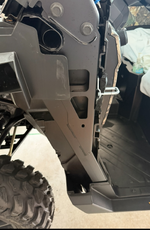
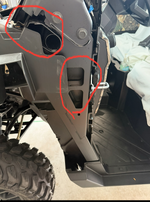
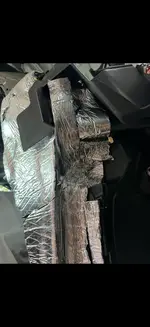
The pictures illustrate the removal of the driver’s front fender, some of the problematic areas, and our insulation efforts. The red circles indicate the open spaces between the cab and the outside air.

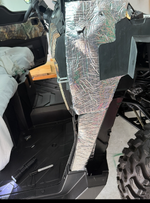
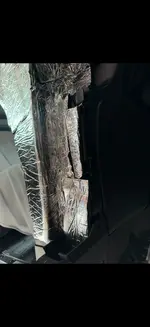
The insulated pictures are from the passenger side project.
 

Attachments

  • IMG_2768.webp
    IMG_2768.webp
    1.7 MB · Views: 3
  • IMG_2764.webp
    IMG_2764.webp
    2 MB · Views: 4
  • IMG_2765.webp
    IMG_2765.webp
    1.5 MB · Views: 1
  • IMG_2767.webp
    IMG_2767.webp
    126.1 KB · Views: 4
  • IMG_2766.webp
    IMG_2766.webp
    149.9 KB · Views: 8
Couple more suggestions. Wear gloves as there are so many areas to cut you. So far I have probably 20 hours of labor in this project and have probably 20 more to go in the insulation area.
 
This is still on my to do list. I just need to find or make the time to get it done. Or have it in my possession long enough, and not have it be in the shop.
 
It was a tedious process, but I finally achieved my goal, sort of. I couldn’t remove the passenger side seat back, so I took a different approach. Instead, I removed the entire backseat frame and moved it forward.
 

Attachments

  • IMG_2789.webp
    IMG_2789.webp
    398.7 KB · Views: 5
Is the frame removed with 4 bolts on engine side of wall? Was it actually leaking from rear panel?
 
I believe there were sixteen bolts on the interior and two bolts on the engine side. Afterward, you need to rotate the frame up and out of a few plastic clips.
 
Back
Top