- #1
Thread Owner
Just finished fabricobbling this chainsaw scabbard 100% from scrap laying around the shop.
Parts list:
3” schedule 80 PVC conduit — 21” length (or as needed)
1pc 3”x5”x1/4” angle iron 10” long
4pcs 1/4-20x1/2” SS torx head countersunk machine screws
2pcs 3/8-16x1” SS flange head bolts
2pcs 3/8-16 SS flange locking nuts
2pcs 3/8” SS flat washers
1 old torn rubber mudflap
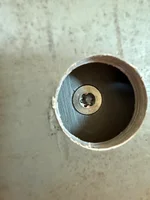
I heated the PVC on the outdoor grill (on a phenolic substrate - not directly on the grid) until softened enough to mold. I had precut a scrap piece of 1/2” plywood 4” wide and 2” longer than the PVC. I also set up two longer pieces of 2x6 to use to clamp the PVC between.
As soon as the PVC was softened, I inserted the 1/2” plywood thru the pipe and clamped the PVC with the plywood inside between the 2x6’s. Left this In the clamp until completely cooled. Had to drive out the 1/2” plywood piece using a scrap piece of 1/4” steel plate.
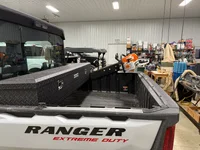
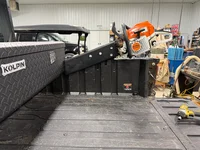
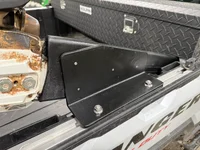
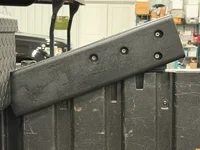
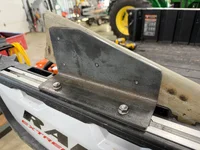
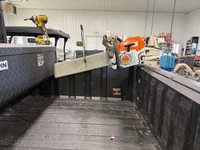
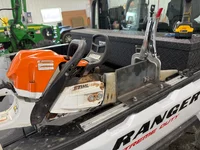
I clamped the scabbard and angle iron in the position I wanted on the passenger bed rail then laid out the hole location to mount the scabbard to the angle. I drilled 1” holes in the PVC scabbard just through one side with a hole saw then drilled through the opposite side with a 5/16 bit. I then transferred the hole locations onto the angle iron and drilled and tapped the 4 - 1/4-20 holes. I used an angled reamer bit to cut the countersinks into the PVC. I cut a strip of rubber from the old mudflap 3”x10” to use as a protective pad between the angle iron and the top of the bed rail. Assembled and test fit the whole thing into the bed rail using the two 3/8-16 flange head bolts.
It turned out so well and is so sturdy that I decided to paint it with bedliner as I will likely leave it mounted full-time.
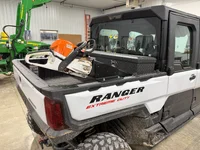
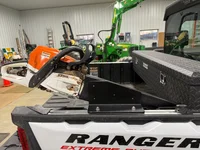
I planned it so that the scabbard fit nicely in the gap between the bedside and my Kolpin tool box. This will easily carry a 20” bar but will also accommodate longer bars up to 32” in its present mounting location.
Can’t believe how solid this thing is and takes up virtually zero room in the bed. So much happier than spending $200 on a Sawhaul product that isn’t nearly as solid.
Parts list:
3” schedule 80 PVC conduit — 21” length (or as needed)
1pc 3”x5”x1/4” angle iron 10” long
4pcs 1/4-20x1/2” SS torx head countersunk machine screws
2pcs 3/8-16x1” SS flange head bolts
2pcs 3/8-16 SS flange locking nuts
2pcs 3/8” SS flat washers
1 old torn rubber mudflap
I heated the PVC on the outdoor grill (on a phenolic substrate - not directly on the grid) until softened enough to mold. I had precut a scrap piece of 1/2” plywood 4” wide and 2” longer than the PVC. I also set up two longer pieces of 2x6 to use to clamp the PVC between.
As soon as the PVC was softened, I inserted the 1/2” plywood thru the pipe and clamped the PVC with the plywood inside between the 2x6’s. Left this In the clamp until completely cooled. Had to drive out the 1/2” plywood piece using a scrap piece of 1/4” steel plate.
I clamped the scabbard and angle iron in the position I wanted on the passenger bed rail then laid out the hole location to mount the scabbard to the angle. I drilled 1” holes in the PVC scabbard just through one side with a hole saw then drilled through the opposite side with a 5/16 bit. I then transferred the hole locations onto the angle iron and drilled and tapped the 4 - 1/4-20 holes. I used an angled reamer bit to cut the countersinks into the PVC. I cut a strip of rubber from the old mudflap 3”x10” to use as a protective pad between the angle iron and the top of the bed rail. Assembled and test fit the whole thing into the bed rail using the two 3/8-16 flange head bolts.
It turned out so well and is so sturdy that I decided to paint it with bedliner as I will likely leave it mounted full-time.
I planned it so that the scabbard fit nicely in the gap between the bedside and my Kolpin tool box. This will easily carry a 20” bar but will also accommodate longer bars up to 32” in its present mounting location.
Can’t believe how solid this thing is and takes up virtually zero room in the bed. So much happier than spending $200 on a Sawhaul product that isn’t nearly as solid.
Attachments
-
 IMG_3972.webp386.2 KB · Views: 3
 -
 IMG_3971.webp337.2 KB · Views: 4
 -
 IMG_3968.webp453.4 KB · Views: 4
 -
 IMG_3970.webp391.5 KB · Views: 5
 -
 IMG_3973.webp355.1 KB · Views: 2
 -
 IMG_3969.webp507.6 KB · Views: 3
 -
 IMG_3967.webp333.6 KB · Views: 3
 -
 IMG_3959.webp694.3 KB · Views: 3
 -
 IMG_3958.webp208.8 KB · Views: 6
 -
 IMG_3950.webp275.5 KB · Views: 4
 -
 IMG_3945.webp411.3 KB · Views: 5
 -
 IMG_3946.webp374.6 KB · Views: 4
Last edited: