• 🔖 It looks like you are browsing the site as a guest. By registering on the site you can participate on the Internet's largest Polaris Ranger XD 1500 forum. To register, simply Click Here!

The cabin rise to hot

JuanRoaro

New member
Mar 26, 2024
2
2
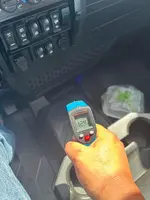
Hi, my name is Juan, recently (3 month ago) I buy a Ranger XD 1500, but I feel that the cabin rise to hot just a few minutes of use. I measure 124 farenheit on a cabin floor. I have an other old Ranger (1000, mod 2000) and don't have that problem... What can I do? Greething from Sonora Mexico, where I live.
 

Attachments

  • WhatsApp Image 2024-03-26 at 16.43.36.jpeg
    WhatsApp Image 2024-03-26 at 16.43.36.jpeg
    106.5 KB · Views: 4
Last edited:
I took the tunnel panels off mine and did Silas on the actual tunnel and everywhere I could reach. I also put a heat shield around the coolant lines. I made an assumption it would heat up some despite winter and unable to tell yet for us in the northern climates. I mentioned what I did on a thread earlier so will look it up and bump that thread so you can see it.

Welcome to forum! Happy to have your input!
 
I agree with red. Mirrors for sure. 32 inch tires really make it look a lot nicer and gives an additional inch of clearance, if you want to spend that money. Part of the reason I switched my tires and wheels is I also wanted to have a spare tire. At least, that was my justification ;). The spare tire holder in the bed really works pretty well. Also easy to take out if you don’t want it In for some reason. If you decide to do a roof rack, you could certainly put your tire there. A nightmare is getting somewhere in the backcountry and not being able to change a tire if it gets shredded for some reason. My toolbox also has tire repair kit and pump, but occasionally that doesn’t do the trick.

In our country rock sliders are a definite must. Just too much opportunity to bang up the edges. I also like to have plenty of light at night, so I would consider a light bar. A brush guard is also something that is nice depending on where you ride. I spliced into the wire on my dome light and added one for the backseat as well. That was a pretty cheap $15 deal. For a two seater you wouldn’t need to worry about that. As far as the unseen, I would add some Silas and heat shield in the tunnel. it’s made mine noticeably quieter. It is already the quietest machine I’ve ever been in. I assume it will also make it cooler in the summer due to the coolant lines being insulated. I also made some floor mats out of stall mat. I’m sure that’s all contributed to it being quieter because you can’t hear the rocks flip up underneath on a gravel road as much.

After seeing Reds toolbox, I did an about face and copied him because I thought it looked so nice. It is great storage space and really first rate. Kind of an expensive box, but not any more than Polaris will charge when they finally get their plastic one.

Excited to see what you do! Post pics for sure!
I didn’t go into too much depth on this one, but discuss a little. I know I mentioned heat shield somewhere too. I will look.
 
Another
I put Siless in the underside of the tunnel today to help with temperature and block even more noise. Pretty simple to do and relatively cheap. I wanted to do it before it got dirty and made it harder. As I suspected, there was no insulation there at all. However, I was surprised there was insulation under the floorboards. I wish Polaris would insulate tunnel rather than save a few dollars. It is a really easy way to shield some heat and noise.

I also made floor mats out of rubber horse stall mat. I used the thicker stuff that is about 3/4 inch thick. You can get either thinner or thicker at Tractor supply. Thicker is about $50 and I was able to do all floorboards with one mat. Thinner would take at least 2 mats because they are smaller. Thicker is heavy and a little difficult to work with, but will not move around and easy to remove to clean. I made patterns for each of the 4 sections with poster board and cut with jig saw. I didn’t think to take pics. Will do it and post tomorrow. These simple mods made the rig even quieter and nicer.
 
This is what I attached to coolant lines. VERY sticky!

Can’t find other places we talked about. Basically put something like above product on coolant lines and some version of Silas on tunnel and will help a lot with noise and assume with heat as well.
 
Also, you might want to look on the xpedition forum because they have had all kinds of problems with heat and noise on that machine and there are lots of ideas to eliminate noise and heat.
 
It's only 38 degrees right now and I have still been using the heat on most rides, so I don't know how hot it's going to be come summer. Past history tells me it will be a problem, my guess is even more so considering there's now a transmission under my ass. Wincollector's advice is sound as that is what most of us have done to reduce the problem in the past.
 
Can you post a tutorial on how to remove panels and insulate the tunnel ?
Thanks !
I don’t have any pics of it, but it’s simple…minus the heat duct on a crew. The zip ties on the heat ducts need to be cut and then replaced when put back together. A little pulling will release front and top rubber duct. It’s the hardest to wrangle out and back in the hole. Underside, will have to lift and cut ties on flexible lines where they connect. Patience and looking for connections and ties. There are three of them, if I remember correctly. One on top front and two underneath. Don’t hold me to it though. Might be something I forgot. It’s been months now. When done reconnect and replace with new zip ties where you cut them.

Pull seat bottoms off/up. Remove the torx screws along edge of tunnel, drink holders and the boxes under seat and lift them up. The boxes and tunnel lift easily. If they won’t lift then a screw was missed somewhere. There is a screw on front of tunnel kind of under dash that’s a little harder to see. When tunnel and boxes are up, put the heat shield along the coolant lines. I used 3 of the shield packages referenced in the Amazon link for a crew. I wrapped along the top sides and well underneath lines. Sticks very well. Should handle temps fine based on specs.

Adhere Siless to underside of boxes, under seat and tunnel panels and anywhere else you can see or reach. For example along side of panel under drivers seat. The underside of floorboards have some insulation, but if you wanted to get really thorough could remove those and add Siless to that. I didn’t. Figured floor mats would be an additional insulation barrier. There are a bunch of different options for Siless on Amazon. Pick whichever you want for thickness to assist with noise and heat. It sticks well too. Some versions of Siless with aluminum barrier are sharp and will cut the hell out of your fingers when pressing etc. I used a little roller and still cut fingers up. Like little paper cuts on steroids. Hurts and bleeds and generally pisses you off. Light gloves would help, but are a pain in ass too because harder to peel barrier off. I did plenty of bleeding here and there. Haha. I did a double layer of two different Siless products. Aluminum on bottom layer and then another slightly thicker more insulation without aluminum on top of that. Maybe overkill, but figured it wouldn’t hurt.

There are a couple of pics on xpedition forum of people who did similar and process is roughly the same. JTBarlow over on that forum shows some pics of insulating his brothers XD. He used fiberglass or bat type insulation in void between floor boards and skid plate bottoms. Personally I wouldn’t do that because I would worry about moisture soaking into insulation. Based on his posts, he’s a hell of a lot smarter than I am on side by sides though so he may be onto something. Search for insulation or similar on that forum and tons of posts will come up including the one he did for his brothers XD. I had already insulated mine when I saw his posts, but he has some good info.
 
Last edited:
I don’t have any pics of it, but it’s simple…minus the heat duct on a crew. The zip ties on the heat ducts need to be cut and then replaced when put back together. A little pulling will release front and top rubber duct. It’s the hardest to wrangle out and back in the hole. Underside, will have to lift and cut ties on flexible lines where they connect. Patience and looking for connections and ties. There are three of them, if I remember correctly. One on top front and two underneath. Don’t hold me to it though. Might be something I forgot. It’s been months now. When done reconnect and replace with new zip ties where you cut them.

Pull seat bottoms off/up. Remove the torx screws along edge of tunnel, drink holders and the boxes under seat and lift them up. The boxes and tunnel lift easily. If they won’t lift then a screw was missed somewhere. There is a screw on front of tunnel kind of under dash that’s a little harder to see. When tunnel and boxes are up, put the heat shield along the coolant lines. I used 3 of the shield packages referenced in the Amazon link for a crew. I wrapped along the top sides and well underneath lines. Sticks very well. Should handle temps fine based on specs.

Adhere Siless to underside of boxes, under seat and tunnel panels and anywhere else you can see or reach. For example along side of panel under drivers seat. The underside of floorboards have some insulation, but if you wanted to get really thorough could remove those and add Siless to that. I didn’t. Figured floor mats would be an additional insulation barrier. There are a bunch of different options for Siless on Amazon. Pick whichever you want for thickness to assist with noise and heat. It sticks well too. Some versions of Siless with aluminum barrier are sharp and will cut the hell out of your fingers when pressing etc. I used a little roller and still cut fingers up. Like little paper cuts on steroids. Hurts and bleeds and generally pisses you off. Light gloves would help, but are a pain in ass too because harder to peel barrier off. I did plenty of bleeding here and there. Haha. I did a double layer of two different Siless products. Aluminum on bottom layer and then another slightly thicker more insulation without aluminum on top of that. Maybe overkill, but figured it wouldn’t hurt.

There are a couple of pics on xpedition forum of people who did similar and process is roughly the same. JTBarlow over on that forum shows some pics of insulating his brothers XD. He used fiberglass or bat type insulation in void between floor boards and skid plate bottoms. Personally I wouldn’t do that because I would worry about moisture soaking into insulation. Based on his posts, he’s a hell of a lot smarter than I am on side by sides though so he may be onto something. Search for insulation or similar on that forum and tons of posts will come up including the one he did for his brothers XD. I had already insulated mine when I saw his posts, but he has some good info.
Thank you !
Great info
 
Back
Top