🗞️ What's new
  • 🔖 It looks like you are browsing the site as a guest. By registering on the site you can participate on the Internet's largest Polaris Ranger XD 1500 forum. To register, simply Click Here!

Polaris Fender Flares

I read that but thought it would still apply it to the correct product. Apparently, the bolt kit falls in the bumper category.

1764587550703.webp
 
Fender Flares (and an unneeded bolt kit) shipped today. I should be able to put on Saturday morning unless it decides to snow again.
 
Fender Kit arrived yesterday, don't know where the bolt kit is at and really don't care either. The parts look nice and seem to line up fairly well, it should be a fairly easy install. Of course you can't read the install manual because Polaris is too cheap to give you one. You would think for $500 they could include 6 pieces of F#cking paper! Not sure what I'm going to use that's short enough to mark the holes on the sides of the fender. I guess I'll have to go to their website to see what the install manual suggest.
 
Fender Kit arrived yesterday, don't know where the bolt kit is at and really don't care either. The parts look nice and seem to line up fairly well, it should be a fairly easy install. Of course you can't read the install manual because Polaris is too cheap to give you one. You would think for $500 they could include 6 pieces of F#cking paper! Not sure what I'm going to use that's short enough to mark the holes on the sides of the fender. I guess I'll have to go to their website to see what the install manual suggest.
Scanning the QR code is a bit of an inconvenience but I guess that’s how they save a few $. I found a scribe works well to mark inside holes for drilling. Be sure to press the flare firmly against the wheel well molding when marking the holes to be drilled. This ensures a nice tight fit once the plastic push pins are installed. It takes a decent amount of effort to push the pins in too. A few choice words help while doing so! Overall it should come out looking very nice.
 
I looked at them again this morning and plan to use a small right-angle pick to scratch the circle for drilling. A straight pick (or scribe) seems too long as it means I would be creating the mark at an angle. I have the rock sliders on so I'm not sure I'm going to put the front mud flaps on, I'll decide once the front flares are on. I'll post pics when I'm done.
 
That is correct, a right angle pick works best. I misspoke using a scribe, meant the pick. I didn't put the mud flaps on either since I have the rock sliders as well. Not sure I'd like the look anyhow. Look forward to the pics when you have em on!
 
Definitely share some pics big red. My understanding is these install with the plastic push pins, is that correct?
 
Sorry for late reply, was flying all day. Correct, drill holes and attach using the plastic push pins. They hold remarkably well.
 
Yes they install with push pins, but I found it impossible to install the ones that fasten to the sides of the fenders (the ones inside the flare) when drilled to the specified 5/16" hole. I have the 2 small pieces under the bed and to play with the mud flaps to finish up the installation. When complete I'll post pics and give a better explanation.
 
I haven't installed mine yet. I am waiting on everyone's pictures to see if I want to put them on. I am torn on the looks with and without the flares on mine. I do think they would help with keeping the machine cleaner.

On another note: did anyone actually receive the bolt kit??lol
 
I have not received the bolt kit yet, I'm assuming they sent it snail mail so probably next week. I'm loading pictures right now I'll post them soon.
 
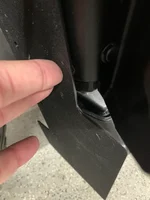
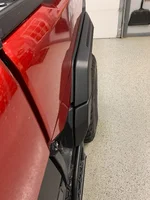
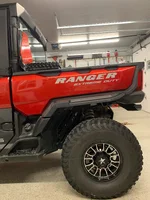
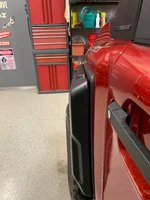
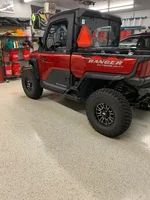
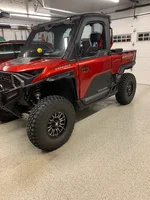
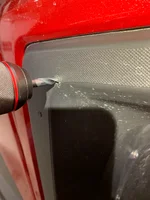
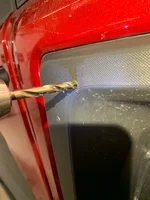
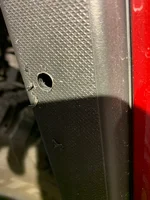
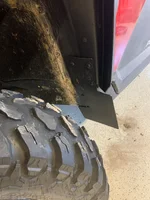
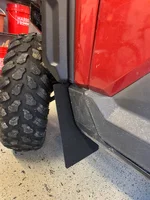
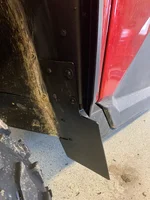
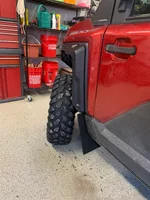
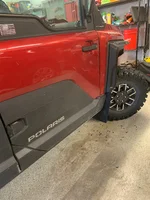
Ok, installation is not hard but I would not follow the instructions as they are written. Basically you position each piece in place then drill 2 holes in the wheel well per Polaris instructions. Put 2 pins in to hold it in place then mark all the other holes. I used a 90 degree pick for the holes inside the flare and it worked great. I did NOT mark the remaining holes in the wheel well because I didn't see a reason to and was concerned they may fight the holes on the inside of the flare, I wanted the flare to be tight to the side of fender. Pull the 2 pins and remove the flare. Drill all the holes on the side of the fender. Here's where I had a problem, I drilled the holes to 5/16" as I was supposed to but I could NOT get the push pin to seat into body, it just would not go in. It goes into the wheel well just fine but the side of the fender is thicker so it's trying to expand inside the hole rather than on the other side of the hole. So I drilled the side holes out to 21/64" and still could not get the pin to seat. I went up 1 more size to a 11/32" and it worked great. The pin snapped into the body tightly and pulled the flare into the side of the fender. So all the holes on the side of the fender I drilled with a 5/16" following the scribe line, then I redrilled it with the 11/32" bit making it 1/32" oversized. I'm NOT telling you to do this, I'm telling you it's what I had to do to get the pin to press in and it worked great for me. After the holes are drilled on the side put the flare back on holding it in place with the original 2 pins in the wheel well. Put all the pins in the side (inside the fender flare) Once those are in place drill the remaining holes in the wheel well with the 5/16" bit, install the pins and your done. I did NOT put on the mud flaps for 2 reasons. One they just look kind of stupid in my opinion and don't stick out so they wouldn't do much to keep mud off the side of the Ranger. The other reason is the Rock Sliders push them too far out from the wheel well and they would never fit tight against the machine. All in all I'm really happy with how they turned out. I made the mistake of telling my brother what I found out installing them, he thought since I had knew how to do it I could install his for him too.
 

Attachments

  • Rear tight.webp
    Rear tight.webp
    566.9 KB · Views: 1
  • Rear Side.webp
    Rear Side.webp
    730.5 KB · Views: 1
  • Front tight.webp
    Front tight.webp
    447.2 KB · Views: 1
  • Front Side.webp
    Front Side.webp
    698.9 KB · Views: 1
  • Rear Angle.webp
    Rear Angle.webp
    1.1 MB · Views: 1
  • Front angle.webp
    Front angle.webp
    1 MB · Views: 1
  • Thick Plastic.webp
    Thick Plastic.webp
    541.8 KB · Views: 2
  • Drill 11-32 hole.webp
    Drill 11-32 hole.webp
    592.7 KB · Views: 1
  • Drill 5-16 hole.webp
    Drill 5-16 hole.webp
    533.1 KB · Views: 1
  • Mark Hole location.webp
    Mark Hole location.webp
    872.4 KB · Views: 1
  • Tools.webp
    Tools.webp
    636.6 KB · Views: 1
  • Rock guard gap.webp
    Rock guard gap.webp
    553.4 KB · Views: 1
They look great big red! I will say there are several of those push pins that are a mofo to get in. I ended up putting on a pair of gloves and pushed like hell. Finally they went in. Once they were in, I feel like they’re gonna be impossible to get off unless they break. Either way anyone installing these just take your time when installing, and they will go on and secure very nicely.
 
Nice write up and photos big red. Those are the nicest looking flares I’ve seen for our machines. They look like they belong versus other brands. I’m still torn whether or not I want to install them.
 
Back
Top